OBS Studio
The OBS Studio integration lets your macros drive OBS: switch scenes, show and hide sources, mute a microphone, save the replay buffer for a clip, start and stop streaming and recording, and a lot more. It also reads what OBS is doing (the live scene, whether you're streaming or recording, and how healthy the stream is) for the Dashboard and for macro conditions. Set it up once and it reconnects on its own every time.
Before you start
- OBS Studio 28 or newer. CroStream talks to OBS through obs-websocket (version 5), which is built into OBS from version 28. Older OBS versions aren't supported.
- OBS can run on the same computer as CroStream or on another one on your network.
Turn on the WebSocket server in OBS
- In OBS, open Tools → WebSocket Server Settings.
- Tick Enable WebSocket server.
- Leave Server Port at
4455unless you have a reason to change it. - Leave Enable Authentication ticked. It protects OBS from other programs on your network.
- Click Show Connect Info and copy the Server Password.
- Click OK.
Connect CroStream
- In CroStream, open Integrations → OBS Studio.
-
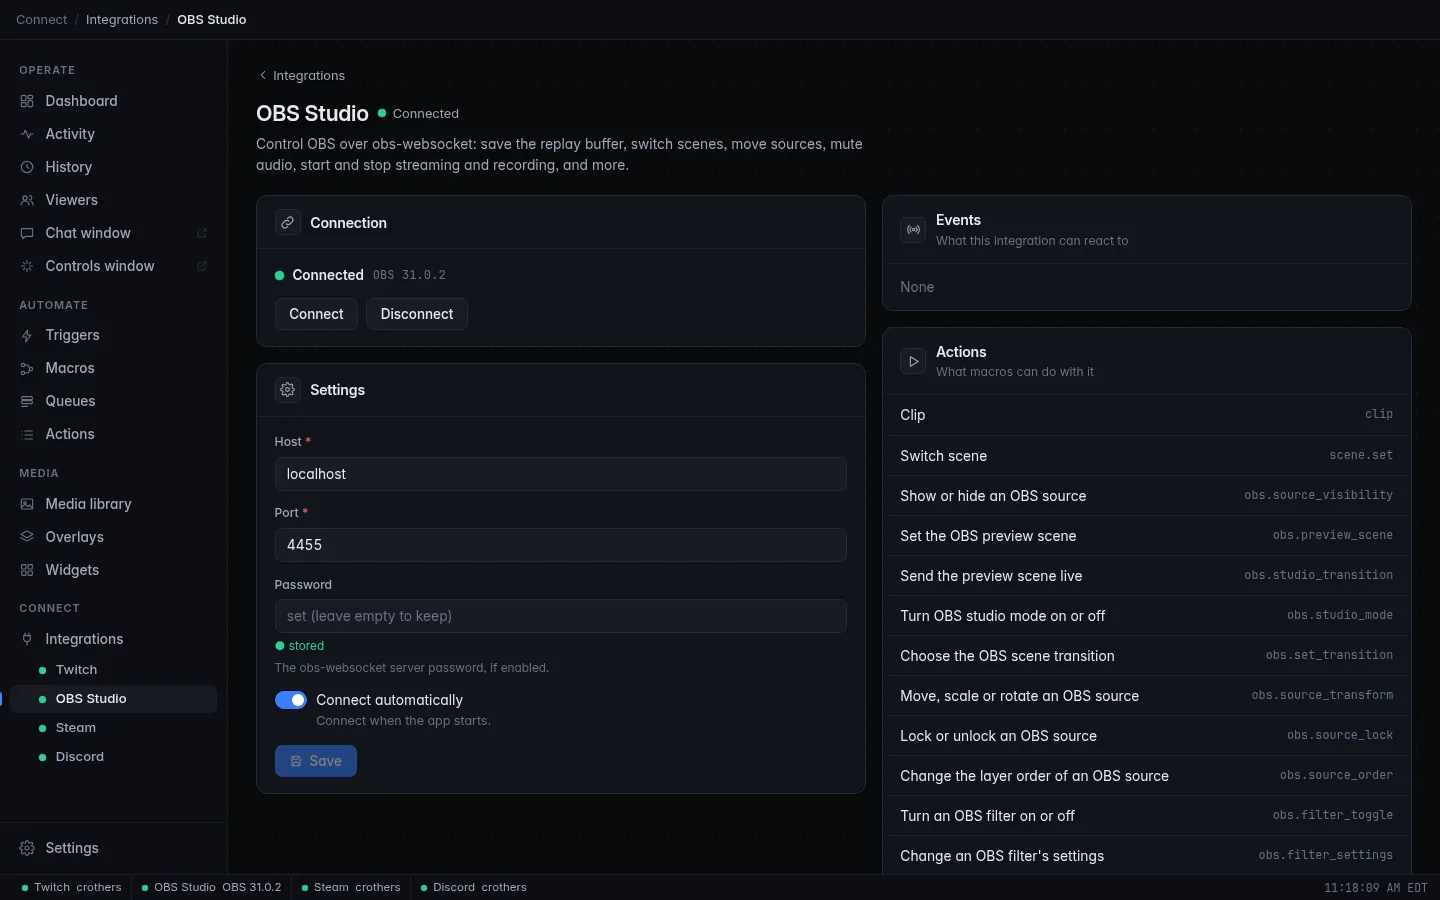
Under Settings, fill in:
Setting What to enter Host localhostwhen OBS runs on this computer (the default). Otherwise the other computer's IP address, such as192.168.1.20.Port The Server Port from OBS. Default 4455.Password The Server Password from OBS. Leave it empty if you turned authentication off. Connect automatically Tick it so CroStream connects to OBS every time it starts. -
Click Save.
- Under Connection, click Connect.
The status turns Connected and shows your OBS version, for example "OBS 32.0.1". From now on, if Connect automatically is on, you never need to click Connect again.
The password is stored safely
The password is kept in CroStream's private secrets folder, not in the
settings file, and the page never shows it again. After saving, the field
is empty and marked stored; leave it empty to keep the stored
password, or type a new one to replace it. See Where files are kept.
Connect saves any changes you haven't saved yet first, so it always uses what's on screen. Changing the host, port or password later and clicking Save reconnects with the new details. Disconnect stops the connection until you click Connect again (or restart CroStream with Connect automatically on).
Staying connected
Once you've clicked Connect, CroStream keeps the connection up by itself:
- If OBS isn't open yet, or closes, the status shows Connecting with the reason, and CroStream tries again: quickly at first, then every 30 seconds at most. Start OBS and it connects within moments.
- If you turn on When Twitch or OBS disconnects under Settings → Desktop app, you get a system notification when OBS stays disconnected for a while.
What CroStream reads from OBS
While connected, CroStream reads OBS's state every two seconds (the scene list every 15 seconds):
- the live (program) scene, the preview scene and whether studio mode is on;
- the list of scenes;
- whether the stream, recording, replay buffer and virtual camera are running, with the stream's and recording's duration;
- stream health: bitrate, congestion, dropped frames and reconnecting;
- OBS's performance: frame rate, CPU, memory, render time and skipped frames.
The Dashboard shows this in its OBS card. Macro conditions can check it too:
| Condition | What it checks |
|---|---|
| Current scene | The scene on air. |
| Preview scene | The studio mode preview scene; empty when studio mode is off. |
| Streaming | OBS is streaming. |
| Recording | OBS is recording. |
| Replay buffer running | The replay buffer is on. |
| Virtual camera running | The virtual camera is on. |
| Studio mode | Studio mode is on. |
| Input is muted | A chosen audio input is muted. |
When you pick a scene, source, audio input, filter, transition, profile or hotkey in an action, CroStream fills the list from OBS, so OBS must be connected while you edit.
What CroStream can do in OBS
OBS has no events of its own in CroStream (its page lists Events: None), but it has the most actions:
| Area | Actions |
|---|---|
| Scenes | Switch scene; set the preview scene; send the preview scene live; turn studio mode on or off; choose the scene transition |
| Sources | Show or hide a source; move, scale or rotate it; lock or unlock it; change its layer order |
| Filters | Turn a filter on or off; change a filter's settings |
| Audio | Mute or unmute; set the volume (in dB); set an audio delay; play a sound in OBS |
| Content | Change the text of a text source; change the picture of an image source; change a browser source's address; reload a browser source; add a browser source |
| Media | Play, pause, stop or restart a video or audio file; jump to a time |
| Outputs | Start, stop or flip the stream, the recording, the replay buffer and the virtual camera; pause and resume recording; start a new recording file (OBS 30 or newer) |
| Clips and markers | Clip (saves the replay buffer); Marker (adds a recording chapter) |
| Other | Save a screenshot of a source; press an OBS hotkey; switch the profile; switch the scene collection; send a request to an OBS plugin |
See Actions for every option.
Some actions change OBS for real
Control the OBS stream can end your stream, and Switch the OBS scene collection swaps every scene. Put them behind a trigger only you (or your moderators) can fire. See Triggers.
Play a sound through OBS
Play sound in OBS plays a file through a media source in OBS, so viewers hear it and it goes to OBS monitoring. It needs a one-time setup:
- In OBS, add a Media Source to a scene that is always shown. To have it everywhere, put it in its own scene and add that scene to every other scene.
- In the media source's properties, turn on Close file when inactive.
- In the action, pick that media source.
To play sounds on your computer instead (for example only in your headphones), use the Play a sound action. See Actions.
The replay buffer and clips
The Clip action captures the moment twice: OBS saves its replay buffer to a file on your computer, and Twitch creates a clip. For the OBS half, the replay buffer must be running:
- In OBS, open Settings → Output → Replay Buffer.
- Tick Enable Replay Buffer and set Maximum Replay Time (how many seconds a saved replay holds). Click OK.
- Click Start Replay Buffer in OBS's Controls dock.
The replay buffer stops when OBS closes. To start it automatically, add a macro step Control the OBS replay buffer (set to start) to a trigger on Stream online/offline, or turn on OBS's own option to start it with the stream.
The saved file's path is available to later steps as {replay_path}.
If the buffer isn't running, the Clip step fails on OBS with "replay buffer is not active"; the Twitch clip is still made.
OBS on another computer
Set Host to the OBS computer's IP address. Make sure that computer's firewall lets CroStream reach the Server Port.
Overlays need OBS on the same computer
CroStream serves overlays only to the computer
it runs on (http://127.0.0.1:62689/overlay/…), so OBS on a different
computer can't load them as browser sources. Run CroStream on the
computer that runs OBS if you use overlays.
Troubleshooting
- The status stays on Connecting.
-
Read the error under the status:
- connection refused or a timeout: OBS isn't running, the WebSocket server is off (see above), or the host or port is wrong. On another computer, also check its firewall.
- authentication failed or a password error: copy the Server Password again from Show Connect Info in OBS, paste it, and click Save.
- It connected before, but not since I updated OBS.
- OBS may have generated a new password. Copy it again from Show Connect Info.
- The status is Disconnected and nothing happens.
- CroStream isn't trying to connect. Click Connect, and tick Connect automatically so it connects at every start.
- Clip fails with "replay buffer is not active".
- Start the replay buffer in OBS. See The replay buffer.
- An action says "this OBS version does not support the request".
- The action needs a newer OBS. Update OBS.
- Scene or source lists are empty when editing a macro.
- OBS isn't connected. Connect it, then open the list again.
- Overlays are blank in OBS.
- See Overlays blank in OBS.
Related
- Getting started: connect OBS
- Overlays: put CroStream's overlays in OBS
- Integrations: status meanings
- Actions and Conditions
- Channel points switch scenes