Overlays
An overlay is a see-through picture that sits on top of your stream: your webcam frame, the chat box, a goal bar, a "Starting soon" screen, the alert that pops up when someone cheers. You build overlays in CroStream, and OBS shows them with a browser source (an OBS source that displays a web page). CroStream serves that page from your PC, so everything you change in the editor appears in OBS straight away, and your macros can change what an overlay shows while you're live.
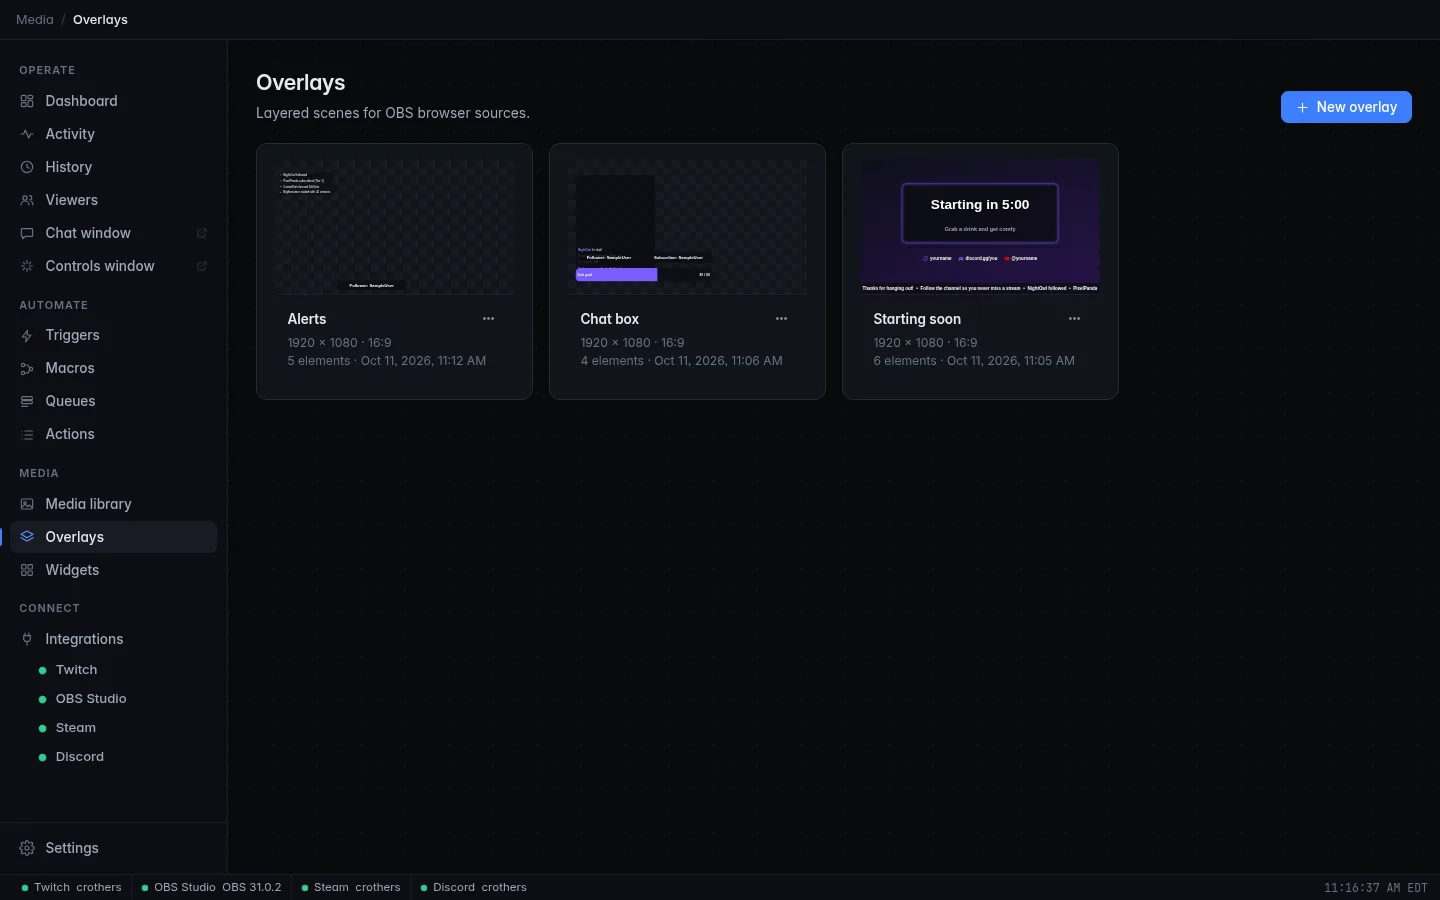
Open Overlays in the sidebar, under Media.
Words used on this page
| Word | What it means |
|---|---|
| Overlay | One scene for OBS, such as "Just chatting" or "Starting soon". Each overlay is one browser source in OBS. |
| Element | One thing on an overlay: a text, a picture, a chat box, a timer. Every element is made from a widget. |
| Layer | An element or a group as it appears in the Layers list. Layers higher in the list are drawn on top. |
| Group | A folder of layers that moves, fades and hides together. |
| Canvas | The overlay's drawing area, at its exact size in pixels (for example 1920 × 1080). |
| Live state | What your macros changed on an overlay while you stream (shown, hidden, new text), on top of the design you made. |
See also the glossary.
Create an overlay
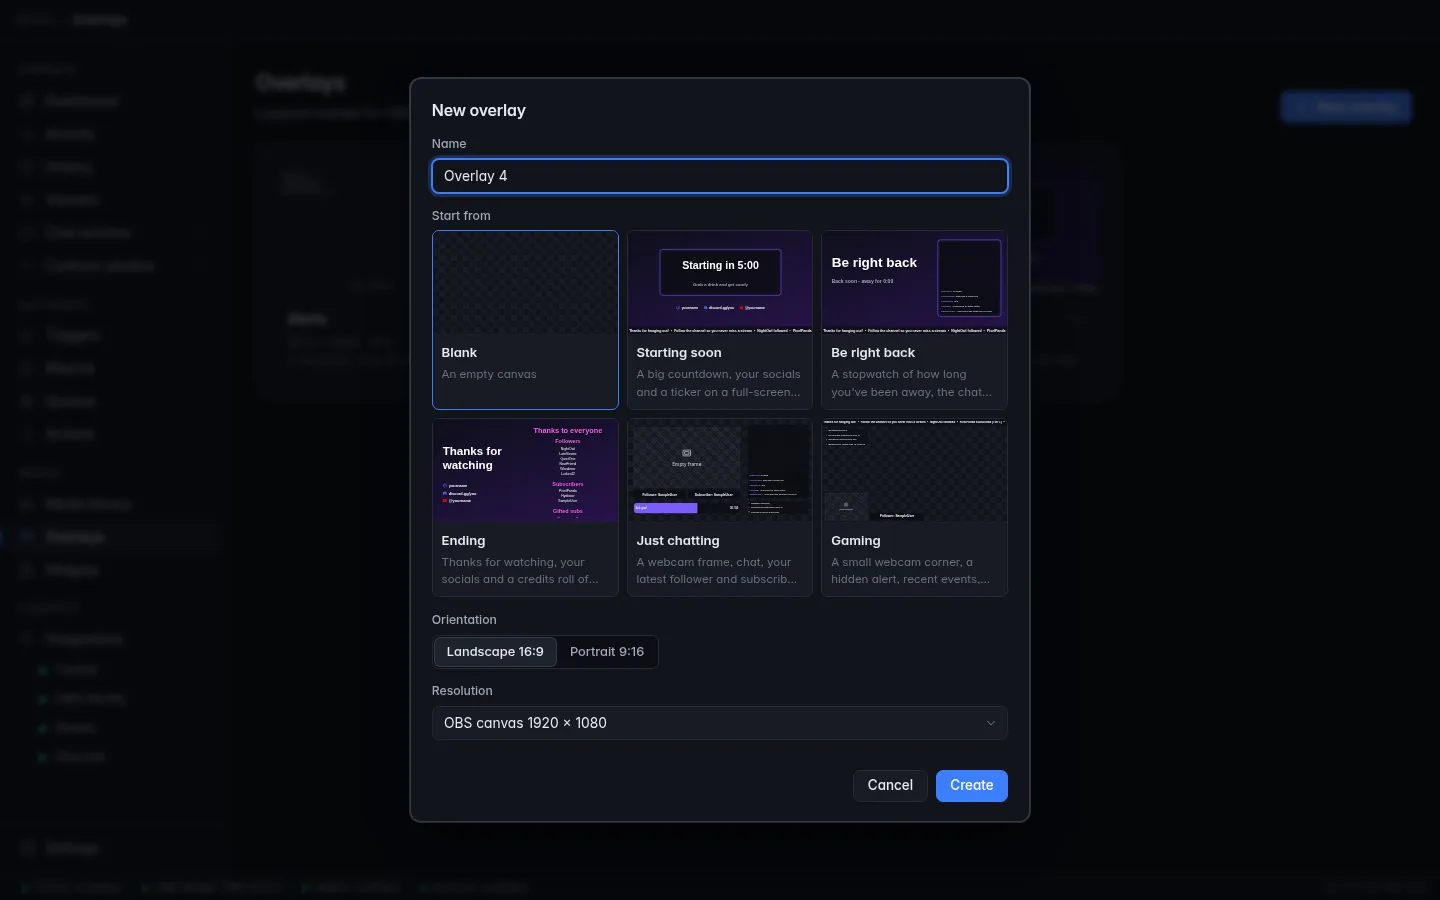
- Open Overlays and click New overlay.
- Type a Name, such as Just chatting.
- Under Start from, pick Blank or one of the ready-made templates (see the table below).
- Pick the Orientation: Landscape 16:9 for a normal stream, or Portrait 9:16 for vertical video.
- Pick the Resolution. When OBS is connected, the list starts with OBS's own canvas and output sizes, so you can match OBS exactly.
- Click Create. The overlay opens in the editor.
| Template | What you get |
|---|---|
| Starting soon | A big countdown, your socials and a ticker on a full-screen backdrop. |
| Be right back | A stopwatch of how long you've been away, the chat and a ticker. |
| Ending | "Thanks for watching", your socials and a credits roll of this stream's supporters. |
| Just chatting | A webcam frame, chat, your latest follower and subscriber, a goal bar and recent events. |
| Gaming | A small webcam corner, a hidden alert, recent events, your latest follower and a ticker. |
Templates work at any resolution: CroStream scales them to the size you pick. Everything in a template is a normal element you can change or delete.
Which size to pick
Make the overlay the same size as your OBS canvas (OBS → Settings → Video → Base (Canvas) Resolution). Most streams are 1920 × 1080.
- Sizes are 16:9 or 9:16 only: 1280 × 720 (720p), 1920 × 1080 (1080p), 2560 × 1440 (1440p) and 3840 × 2160 (4K), and the same four turned on their side for portrait.
- OBS can show an overlay at a different size of the same shape. The page scales evenly, so text and shapes stay sharp, but pictures are resized and may look soft.
- You can change the size later in the editor (Canvas size, with nothing selected). Elements keep their pixel positions, so you may need to move them.
Pixel-perfect
For the crispest result, make the overlay exactly the size OBS draws it, and don't resize the browser source in OBS.
The Overlays page
Each card shows a live preview, the overlay's size and shape, how many elements it holds and when it was last changed. Click a card to open it in the editor. Click ⋯ on a card (or right-click it) for:
| Menu item | What it does |
|---|---|
| Edit | Opens the overlay in the editor. |
| Copy OBS URL | Copies the address to paste into an OBS browser source. |
| Add to OBS | Creates the browser source in OBS for you. See Add it to OBS. |
| Duplicate | Makes a copy named "… copy". Handy for trying a new look without touching the one on stream. |
| Rename | Changes the overlay's name. The OBS URL stays the same. |
| Delete | Removes the overlay. Any OBS source that shows it goes blank. |
Deleted overlays can be recovered
Delete moves the overlay's file into a trash folder instead of erasing it. See Where files are kept if you need one back.
Add it to OBS
Every overlay has its own address. OBS loads that address in a browser source. There are two ways to set it up.
The easy way: Add to OBS
This needs CroStream connected to OBS. See OBS Studio.
- On the Overlays page, click ⋯ on the overlay's card, then Add to OBS.
- Pick the Scene to add it to.
- Check the Source name. It starts as the overlay's name.
- Leave Width and Height at the overlay's size.
- Leave Control audio via OBS on, so alert sounds and videos go through OBS's audio mixer and your viewers hear them.
- Click Add source.
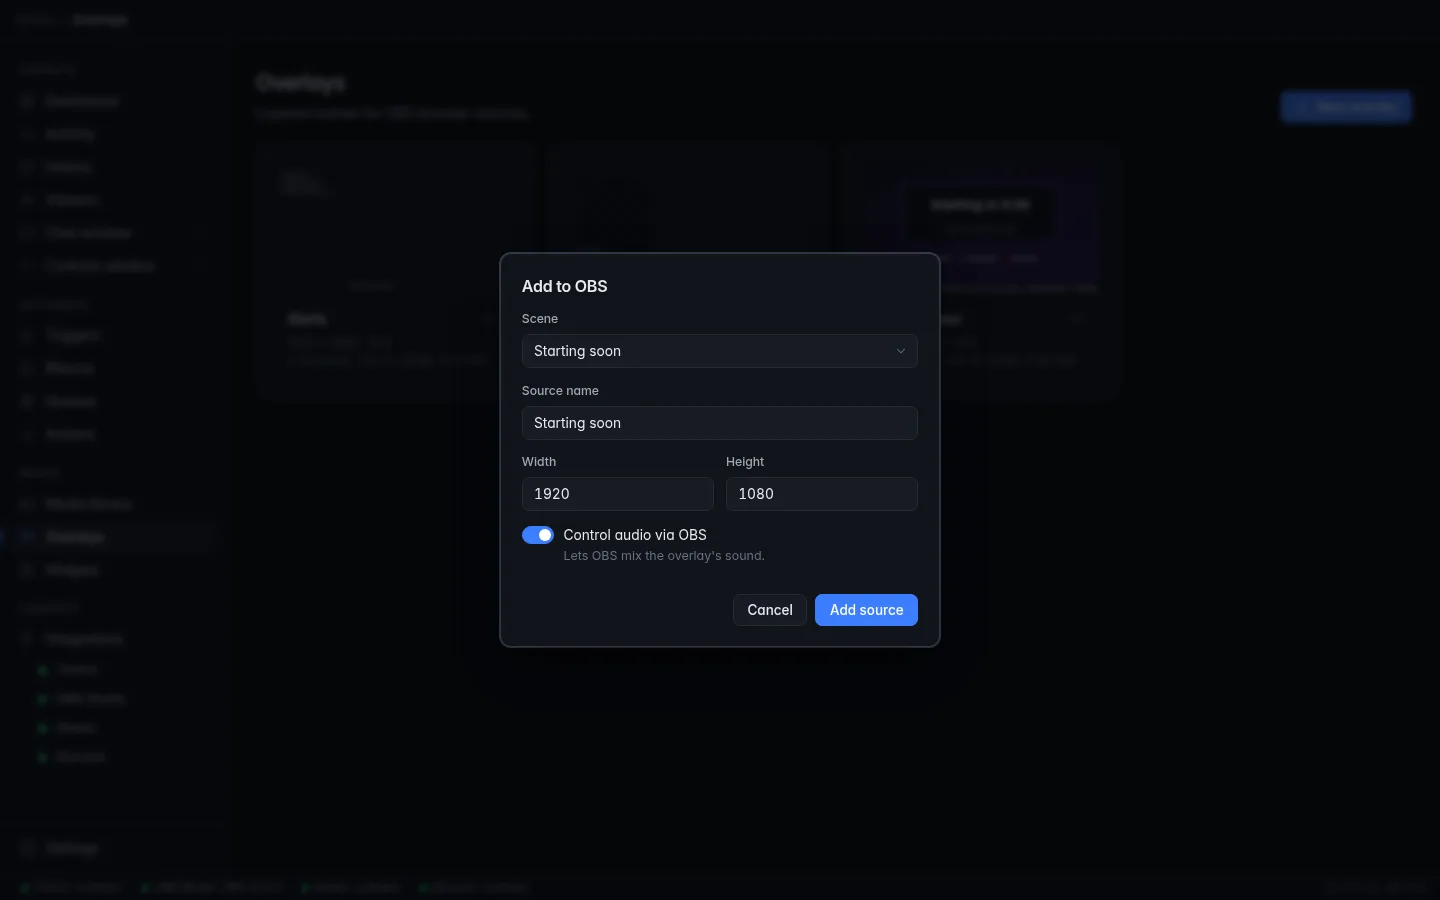
CroStream creates the browser source in that scene with the right settings (listed under By hand). If OBS isn't connected, the dialog says Connect OBS first and links to the OBS page. If OBS already has a source with that name, pick another name.
By hand
- Copy the address: ⋯ → Copy OBS URL on the card, or Copy OBS URL at the top right of the editor.
- In OBS, click + under Sources, choose Browser, give it a name and click OK.
- Paste the address into URL.
- Set Width and Height to the overlay's size (shown on its card and in the editor's toolbar, for example 1920 × 1080).
-
Use these settings, the same ones Add to OBS uses:
OBS setting Set it to Why URL The address you copied The overlay's page. Width / Height The overlay's size One overlay pixel is one OBS pixel. Control audio via OBS On Alert sounds and videos appear in OBS's mixer and reach viewers. Use custom frame rate Off Shutdown source when not visible Off The overlay keeps running, so alerts and timers are ready the moment the scene shows. Refresh browser when scene becomes active Off Not needed: the overlay updates by itself. Page permissions Leave at the default Your own custom widgets need it. -
Click OK.
The address looks like this:
127.0.0.1 means "this PC", so OBS must run on the same PC as CroStream.
When CroStream runs in browser mode,
the address uses that server's address instead, and Copy OBS URL copies
the right one.
No refresh needed
OBS picks up every change you make in the editor within a moment. You never need to press Refresh on the browser source. If you rename the overlay, the address doesn't change.
The editor
Click an overlay to open the editor. It has four parts:
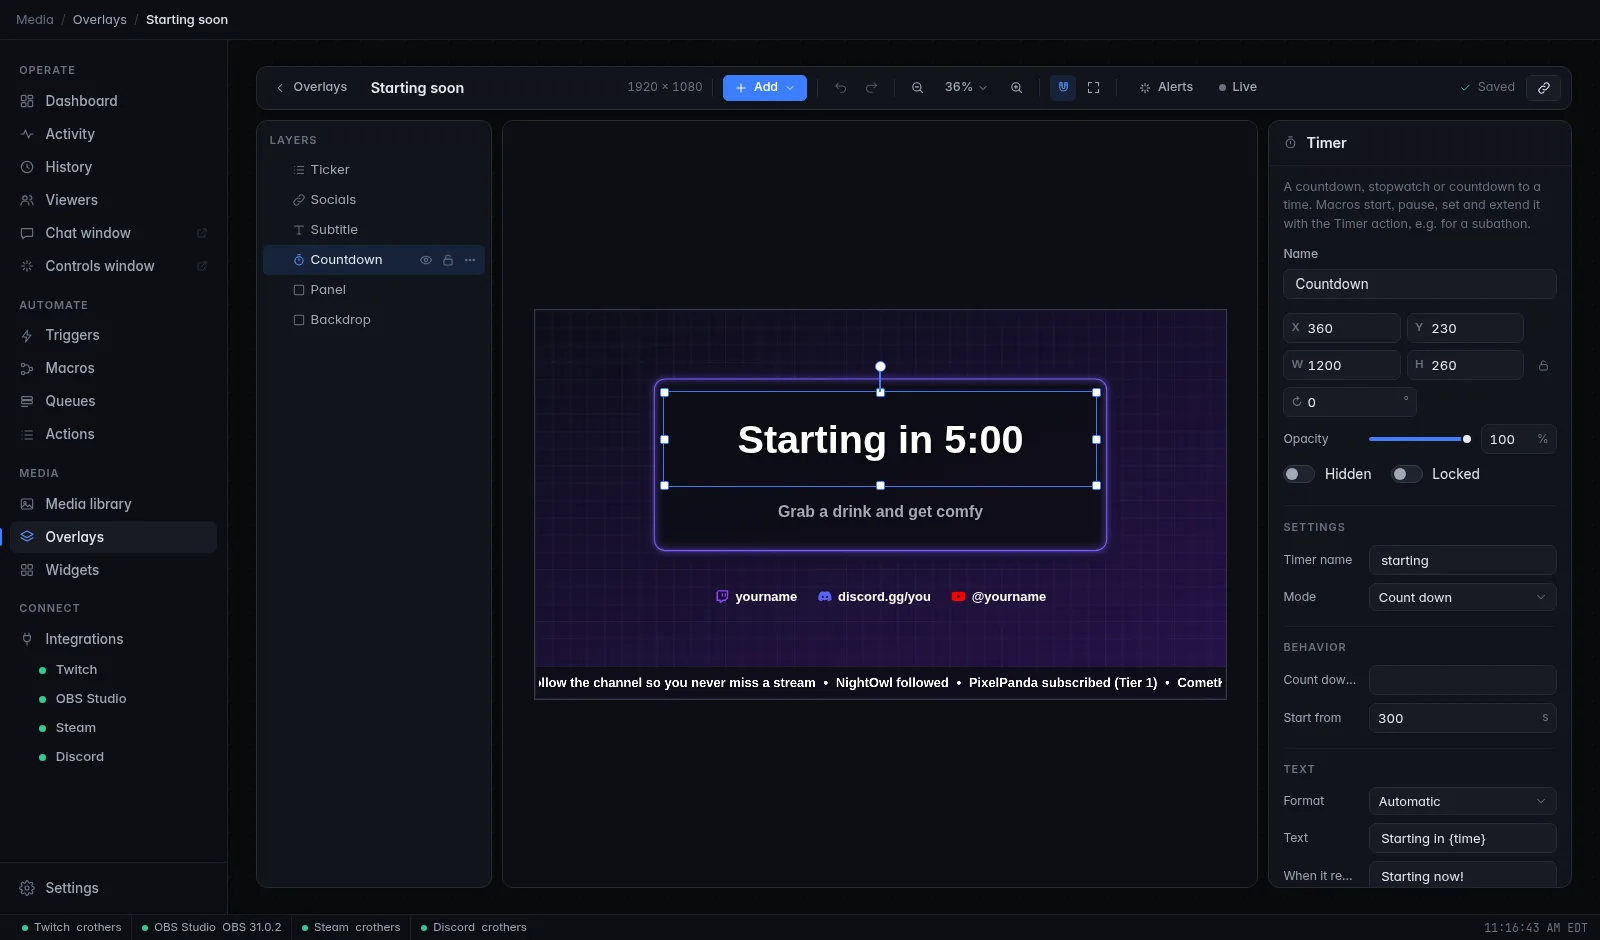
- Toolbar (top): add elements, undo, zoom, snapping, alerts, the live preview, the save status and Copy OBS URL.
- Layers (left): every element and group, top layer first.
- Canvas (middle): the overlay at its real proportions. A checkerboard shows the see-through parts.
- Inspector (right): the settings of whatever is selected, or of the overlay itself when nothing is selected.
Your changes save themselves a moment after each edit. The toolbar shows Saving…, then Saved.
The toolbar
| Button | What it does |
|---|---|
| ‹ Overlays | Back to the list. |
| Name box | The overlay's name. Click to rename it. The size is shown next to it. |
| Add | Puts a new element on the canvas. See Add elements. |
| Undo / Redo | Steps back and forward through your edits. |
| Zoom out / 100% / Zoom in | Zooms the canvas. The percentage opens a menu with Fit, 25%, 50%, 100% and 200%. |
| Magnet | Snapping: elements line up with the canvas edges, its center and other elements as you drag. On by default. |
| Frame | Safe area guides: shows the title-safe (90%) and action-safe (93%) boxes and the center lines, so nothing important ends up at the very edge. |
| Alerts | Lists the alerts on this overlay and lets you add one. See Alerts. |
| Live | Shows on the canvas what's on stream right now: alerts as they play, and what your macros changed. See Live preview. |
| Reset (while Live is on) | Reset live state: puts the overlay back to its design. |
| Saved / Saving… / Not saved | Whether your changes are stored. |
| Copy OBS URL (link icon) | Copies the overlay's address for OBS. In a narrow window only the icon shows. |
Add elements
Click Add in the toolbar. The menu is in groups:
- Basics: Text, Rectangle, Frame, Line, Image, Video, Sound, Icon, and Group (an empty group).
- Alerts & data: Set up an alert… (the alert wizard), then Alert, Latest event, Counter, Goal bar, Event list, Chat box, Leaderboard, Stream info, Hype train, Poll and Credits.
- Time: Timer and Clock.
- Fun: Prize wheel, Particles, Chat emotes, Slideshow, Ticker and Socials.
- Your widgets: widgets you made or imported, and Make your own widget… (or Manage widgets…), which opens Widgets.
The new element lands in the middle of what you can see, already selected. For an image, video or sound, the media picker opens so you can choose a file from your media library.
What every element does and all its settings: Widgets.
Select, move, resize and rotate
- Click an element on the canvas or in Layers to select it. Click empty canvas or press Esc to select nothing.
- Drag it to move it. Hold Shift to move in a straight line.
- Drag a corner or edge handle to resize. Pictures, videos, icons and the prize wheel keep their proportions; hold Shift to change that while you drag. Hold Alt to resize from the center.
- Drag the round handle above the element to rotate it. Hold Shift to turn in 15° steps.
- Arrow keys nudge the selection 1 pixel; with Shift, 10 pixels.
- While you drag, a small label shows the position, size or angle.
Snapping pulls edges and centers onto the canvas edges, its center lines and the other elements, and draws a guide line when it does. Hold Ctrl (Cmd on a Mac) while dragging to skip snapping once, or turn it off with the magnet button.
Zoom and pan: Ctrl + mouse wheel zooms at the pointer. The mouse wheel on its own scrolls the view; hold Space and drag, or drag with the middle mouse button, to pan.
Hidden and locked layers
You can't click hidden or locked layers on the canvas. Select them in Layers instead. Hidden layers are drawn faded in the editor so you can still see and edit them; in OBS they're invisible.
The inspector
With nothing selected, the inspector shows the overlay's own settings:
- Name.
- Canvas size.
- OBS browser source: the address, Copy URL, and the size to set in OBS.
- Theme: the overlay's colors and fonts. See Theme.
- Overlay CSS: your own styling for the whole overlay. See Custom CSS.
With an element selected, it shows, from the top:
| Setting | What it does |
|---|---|
| Help line | What this kind of element is for. |
| Name | The layer's name. Macros pick elements by name, so name the ones you'll show or change from a macro (Cheer alert, Death counter). |
| X / Y | Position of the top-left corner, in canvas pixels. |
| W / H | Width and height in pixels. The lock button next to them keeps the proportions. |
| Rotation | Angle in degrees. |
| Opacity | 0 (invisible) to 100% (solid). |
| Hidden | Hides the element in OBS. Macros can show it later. |
| Locked | Stops it being picked or moved on the canvas. |
| Used by | The macros that show, hide or change this element, with the triggers that run them. Click one to open it. |
| Element settings | Everything particular to this kind of element, in sections (Font, Layout, Effects…). See Widgets. |
| CSS | Your own styling for this element only. |
For a group, the inspector shows its name, position, opacity and the Hidden and Locked switches; its size comes from what it holds.
Layers and groups
The Layers list shows every element, top layer first: what's higher in the list is drawn over what's below.
- Drag a layer up or down to change the order, or onto a group to put it inside.
- Double-click a name to rename it.
- The eye button hides or shows a layer; the lock button locks it.
- ⋯ (or right-click, on the list or the canvas) opens the layer menu:
| Menu item | What it does |
|---|---|
| Duplicate | A copy just above the original (Ctrl+D). |
| Wrap in group | Puts the layer in a new group (Ctrl+G). |
| Ungroup | Takes the layers out of a group and removes it (Ctrl+Shift+G). |
| Bring to front / Bring forward / Send backward / Send to back | Changes the drawing order. |
| Show / Hide | Same as the eye button. |
| Lock / Unlock | Same as the lock button. |
| Delete | Removes the layer (Del). |
A group moves, fades and hides everything inside it at once. That's ideal for things you show together: a "Be right back" panel with its text and picture, or a custom alert. Groups can hold groups, up to 8 levels deep. An overlay holds up to 1,000 layers.
Keyboard shortcuts
| Keys | What they do |
|---|---|
| Ctrl+Z | Undo |
| Ctrl+Shift+Z or Ctrl+Y | Redo |
| Ctrl+D | Duplicate the selection |
| Ctrl+G | Wrap the selection in a group |
| Ctrl+Shift+G | Ungroup |
| Del or Backspace | Delete the selection |
| Arrow keys | Nudge 1 px (with Shift, 10 px) |
| Esc | Select nothing |
| Ctrl+0 | Fit the canvas in the window |
| Ctrl+1 | Zoom to 100% |
| Ctrl++ / Ctrl+- | Zoom in / out |
| Space + drag | Pan |
On a Mac, use Cmd instead of Ctrl.
Changed in another window
If the same overlay is open in two places (say, the app and the browser UI) and both change it, the second one gets the message This overlay was changed in another window. Click Reload to load the current version; the edits that weren't saved are dropped.
Theme
Each overlay has a theme: eight colors (Primary, Secondary, Accent, Text, Muted, Panel, Border, Highlight) and two fonts (Heading and Body). Select nothing to see it in the inspector.
Many settings can follow a theme color or font instead of using a fixed one. Most built-in elements do this out of the box. Change the theme's Primary color, and every element that follows Primary changes with it. So you can re-color a whole overlay in seconds, or copy an overlay and give the copy a different theme.
Reset to default theme puts the original colors and fonts back.
Fonts
Click any Font setting to open the font picker. It lists, in one searchable list:
- Installed: fonts installed on this PC;
- Google Fonts: free fonts downloaded on demand. Picking one downloads it once into a Fonts folder in your media library, so it works on stream even without internet;
- My fonts: font files in your media library (TTF, OTF, WOFF or WOFF2).
The picker can also filter to In this overlay, Recently used and the theme's fonts (Theme heading, Theme body). Each row previews in its own font; type your own Sample text to try it.
Installed fonts belong to one PC
An installed font only works where it's installed: on the PC where CroStream and OBS run. Move your setup to another PC and those texts fall back to a default font. Google Fonts and font files in your media library always travel with your overlays.
Text effects
Every text setting (text elements, alert headline and message, latest event, counter, goal, event list, chat and more) has an Effects panel:
- Fill: a solid color, a gradient, or an image showing through the letters.
- Outline: up to two.
- Shadows: up to six, each with its own offset, blur and color.
- Glow and 3D depth.
- Highlight: a marker-pen band behind the words.
- Decoration: underline styles.
- Blend: how the text mixes with what's under it (Multiply, Screen, Overlay…).
- Layout: shrink to fit the box, a single line with "…", skew and stretch.
- Animation: looping effects for the whole text (Pulse, Float, Shake, Shine, Rainbow) or per letter (Wave, Bounce, Jitter, Typewriter).
Presets give you a finished look in one click: Clean outline, Neon, Gold, Retro 3D, Comic, Glass, Fire, Ice, Marker and Rainbow. Made a look you like? Save as preset to reuse it on any overlay.
Heavy effects can slow OBS down
Big glows, many shadows and blurs cost OBS work on every frame. When a look gets heavy, the panel says Heavy effects can slow OBS down. Chat messages only use the still effects (no animation).
Frames and lines
A frame is a styled box. You get one as the Frame element, and the same frame settings style the box behind many other elements: the chat box and each message, the event list and its rows, the alert's box, the goal bar's track and fill, and the "plate" behind texts like the counter.
| Section | What you can set |
|---|---|
| Shape | Rectangle with rounding (each corner separately if you like), Cut corners, Tab, Pill, Slant, Ticket, Hexagon, Bubble (a speech bubble with a pointer), Ellipse, Triangle, Star, Polygon, Heart, Arrow. |
| Fill | A color or gradient, with an optional pattern: Stripes, Dots, Grid, Checker, Scanlines, Carbon. Can be left see-through, for example around a webcam. |
| Border | Solid, Dashed, Dotted or Double; a color or gradient; extra Rings around it. |
| Brackets | HUD-style corner brackets. |
| Shadows, Glow, Bevel, Texture | Depth and grain. |
| Animation | Running light, Marching ants (needs a dashed border), Pulse, Shine. |
| Image frame | An artist's frame picture instead of the shape, fill and border. Its corners keep their size and its edges stretch to fit, so it looks right at any size. |
| Padding | Space inside: keeps the content away from the frame's edge. |
Ten built-in frame presets get you started: Minimal, Glass, Neon, Sci-fi HUD, Esports cut, Retro pixel, Cozy rounded, Webcam frame, Speech bubble and Ticket. Save your own as presets too.
The Line element draws a line or divider: solid, dashed or dotted, with an optional gradient, ends (arrow, dot, diamond, round, square), a glow and a flowing or pulsing animation. Its width is the line's length; rotate the element for other angles.
Make overlays react to your stream
Overlays come alive with macros. Any macro can use the Overlays actions:
| Action | What it does |
|---|---|
| Show an overlay element | Shows an element or group with an animation, and can hide it again after a while (Hide again after, for example 10s). |
| Hide an overlay element | Hides it with an animation. |
| Toggle an overlay element | Shows it if hidden, hides it if shown. Good on a hotkey. |
| Set overlay text | Changes the words of a text element. Use placeholders like {user}. |
| Set overlay media | Swaps an element's picture, video or sound for another file from your media library. |
| Play media or fire an effect | Plays a video or sound from the start, or fires a burst of a Particles element. |
| Reset an overlay | Drops what macros changed on one element or a whole overlay. |
| Show an alert | Shows an alert with the event's details filled in, then hides it. Alerts take turns. See Alerts. |
| Control a timer | Starts, pauses, resumes, resets, sets, adds to or subtracts from a timer, for example add 5 minutes per sub for a subathon (with Longest countdown as a cap). |
| Spin the wheel | Spins a prize wheel. Later steps can use {result}, the winning slice. |
The animations are Fade, Slide up, Slide down, Slide left, Slide right, Zoom, Pop and None. Full details: Actions reference.
Data elements also update by themselves: the Counter and Goal bar show counters that the Change a counter action changes, and Latest event, Event list, Chat box and the others follow your Twitch channel.
Live state
What macros change is the overlay's live state. It sits on top of your design and doesn't change it:
- what a macro showed, hid or rewrote stays that way, also after you restart CroStream, until another macro changes it or you reset it;
- alerts leave nothing behind: they hide again when they're done;
- your design in the editor stays as you made it.
To go back to the design, use Reset an overlay in a macro, or the Reset live state button in the editor (it appears while Live is on). Resetting also ends an alert that's on screen.
Live preview
Click Live in the toolbar to see on the canvas exactly what's on stream right now: alerts as they play and what macros changed. A red Live tag shows on the canvas while it's on. Click it again to see only your design. Testing an alert turns Live on for you, so you see it play.
Custom CSS
If you know a little CSS you can restyle anything. Select an element and open CSS at the bottom of the inspector to style only it, or select nothing and use Overlay CSS to style the whole overlay. Many elements have named Parts you can target (turn on Show on canvas to see them), and Starters insert ready-made snippets. The box colours your CSS, suggests property names as you type, and underlines mistakes such as a misspelt property; hover the underline to see what's wrong.
The full guide is in Development → Custom CSS.
Where overlays are stored
Each overlay is one file in the overlays folder of CroStream's config
folder. Deleted overlays go to overlays/trash. See
Where files are kept and
Backups.
Troubleshooting
| Problem | What to do |
|---|---|
| The browser source in OBS is blank. | Check that CroStream is running: it serves the page. Check the URL has no typo (use Copy OBS URL again). If the overlay was deleted, the source stays blank. |
| The overlay is the wrong size or blurry in OBS. | Set the browser source's Width and Height to the overlay's size, and don't stretch the source in the OBS preview. Make the overlay the size of your OBS canvas. |
| Viewers don't hear alert sounds or videos. | Turn on Control audio via OBS in the browser source, and check its slider in OBS's Audio Mixer isn't muted. |
| An element doesn't show in OBS. | Is it Hidden (eye button in Layers)? Is a macro keeping it hidden? Turn on Live to see the live state, or Reset live state. Is it outside the canvas? Whatever sticks out past the canvas edge is cut off, and the overlay page never scrolls, so one element hanging off the edge can't shift the rest. |
| Add to OBS says to connect OBS first. | Connect OBS: OBS Studio. Or add the source by hand. |
| A font looks different in OBS. | It's probably an installed font that isn't on the PC running OBS. Use a Google font or a font file from your media library. |
| OBS gets slow after adding effects. | Remove large glows, blurs and animated frames, and watch for the Heavy warnings. |
| A custom widget shows a note instead of its content. | On Linux, custom widget code doesn't run inside the desktop app; it does run in OBS. See Widgets. |
Related
- Widgets: every built-in element and its settings
- Alerts: follower, sub, cheer and raid alerts
- Media library: the pictures, sounds, videos and fonts overlays use
- Macros and Actions reference
- OBS Studio
- Tutorial: Build an alerts overlay